Sunday, January 24, 2010

Handmade Raddle for the Loom

I wanted to try to warped my loom back to front so I could double thread my reed and I needed a raddle to try it.  I found a blog where someone showed how to do it and my husband made me one.  I am using ponytail holders to keep the threads in place.

I have not had a chance to really try it but I think it will work fine.  It only costed maybe less than a dollar and everything was in his stash of nails & wood.  It saved me @ $50 to $60.

Now on to making a stand for the rigid heddle!

Needle Keeper!


I have been sewing some - made a needle keeper that is alittler larger than most but it has it all.

Embroidered the GRITS design which was freebie but I forgot where I got it.  I added a Bernina  minature design and added needlecase.
Lined with come cotton batting and a cute muti-color cotton fabric that was in my stash of scraps.
Buttonholed stitch around.  Took some felt added alittle pocket to hold a needle threader, a strip of fabric across the bottom and divided it so I have three compartments.  After I placed the packs of needles in it, saw that they could fall out so I went back and added a strip of fabric across the top to help hold them in place.  Added a button and button hole - put the pins, needles, etc., in it and it is finished! 
Now I have to get some more made!  I think they will make great presents!

What's on the Spindles!!!

All my spindles have yarn on them!  My cd still has the last of the novelty roving that I bought at the Gatlinburg Spinner - I got to get it off and washed.  Not sure what to do with it though.
That's my problem - I love to spin but then I can't decide what to do with it - so far almost all, of it except for the pitiful first skeins, have went to my daughter that way I don't have to worry about it and she gets some handspun.

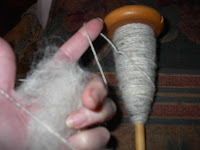
One spindle has the light color that I got from the raw jacob fleece that my DH bought in Murfreesboro last fall. After separating the colors in the fleece, washing and drying it, I started with the light color.  It reminds me of frost because it has some of the gray blended in it but not much. 

Oh - must tell you about the carding tools I am using!  Found these at a local pet groomers, they are great.  They are called Frank's Universal Dog Brushes.  Made in Germany, larger than most brushes, curved just like wool carding combs but just cost $6 each.  I really believe they must be made by the same company that makes wool combs.  They are plastic but strong.  Someday, maybe, I will have real wool combs  - but now these are great for someone that really don't what they are doing!

Okay, the other spindle (my handmade one - isn't that cool to be able to say!), has the jacob roving that I bought last fall.  It was already ready to spin - so soft and smooth.  Beautiful shades of jacob - and  the name of the sheep was Teva (named after the shoes) - isn't that great - this yarn will be called TEVA!


New Way to Wind a Bobbin!!

Everytime I need to wind a bobbin for my loom shuttle, I have to try to find the drill to do it or wind it my hand (which takes forever!)  The drill works great but since I don't get to work very often, I hate to keep my husband's drill all the time.

I have been searching for a way to have a portable, small way to do this without having to spend $100 or more for a bobbin winder.  I tried a couple different things that worked but still not what I wanted - fast and smooth.

On Ravelry, I found a post about someone using a small battery operated smoothie hand blender.  I had one in a drawer (aren't junk drawers - great!).  I had had this blender for about 10 years - it had the same batteries in it that I put in orginally.  Thankgoodness they had not leaked but they actually stilled worked.

I had to cut the curved ends off the ends so they would fit in the middle of the bobbin.  The bobbin fit snugly on the wands - started the chenille yarn - and WOW, I worked!  Fast, smooth - all the things I needed.
And I still have one wand intacked - so I can still use it in a protein shake if I wanted to!

It has a storage case and be stored in a little drawer by my chair - I can easily put it in my Ashford bag to carry it with my rigid heddle if I want to take it with me. 

I will still use the drill when I am working on my big loom but this is perfect to be able to wind a bobbin fast for the rigid heddle anywhere I am working on it.  This is perfect for any portable loom!

Rigid Heddle Weaving!

Ashford Knitter's loom is warped and going!  I warped the entire 20" with about 3 yards of black cotton blend thread.  Weaving with two colors of chenille that I bought at R&M Yarns - beautiful varigiated brown and a soft black.  I decided to do random stripes so I did not have to keep up with a planned pattern. 

I am not sure if it will be a wrap or some fabric to make something else with. Because the strips are going across and not vertically I am not sure if it would make good fabric.

Weaving Room - Now No Excuses!!!

Okay - I have to get to work and get my Mira warped up - NO EXCUSES!!!  I have my room set up and though I am still finding little cuties things to put in it - I need to get it working!!

This is a great room!  I have a closet to put my yarn and cones of thread in that I have to get organized better, of course.  My duclimer is where I can pick it up and play whenever I want - displayed on the pretty stand .  A TV and DVD, my books & magazines, the table loom that I am working to restore has a place - so cool!!!!


My husband made me a raddle for my loom - I was having problems with warping some fine cotton thread so I showed him a raddle in a book.  He made it in about an hour - great - that saved me about $50 or more (I need a new reed in a different size - almost paid for that).  He is working on me a stand for my Ashford rigid heddle that I bought from the Galtinburg Spinnery - I am so blessed that he likes to try to make some of the things I could use!!!!

My First Handmade Spindle!!


I have 2 spindles - my first was a cd spindle made by my husband and the second was a spindle that I bought in a kit at Yarn Haven in Knoxville.  Now, I have made my first spindle and I am hooked on trying to make more!!!

Everything came from Hobby Lobby except the hook ( I wanted a antique looking hook and could not find one small enough to buy so I dug thru my drawer and low & behold I found one thanks to a clutter junk drawer). I headed to my husband's tools and found a little saw so I could cut grooves on each side of the wheel so I would hold the thread.

 First I stained all the wood walnut; let them dry; then I assembled them using alittle wood glue and putting the rubber washer at the top and bottom of the spindle circle.  I don't know if the black washers are going to help much but I kinda like them there anyway. 
I then rubbed the wood with melted bees wax.  I let it set for a while than I could not wait any longer - I had to spin. 


It spins great - it is heavier than my other wheels so I don't know if I could spin as thin but I really liked what I did.  I used some Jacob roving I bought at the Murfreesboro fiber festival last fall and I love it.  I had been saving it for a wheel but thought I better go ahead and start - don't know when I will have wheel.

The spindle spins & spins - this is so cool!!!!  I am hooked - I have enough to make 3 more wooden spindles.